Picture
Yes I'm aware I have yet to do any cooking pins since my fruit snack fiasco until this moment.  What can I say I'm scared. :)

When I was pregnant with my first son I fell in love with waffles. So much so that two people got us waffle irons for Christmas likely because they were tired of listening to me. But I'm an forever greatful to them because I LOVE it especially now that I have this recipe. 

I like this recipe because, I found it on Pinterest here, it was created by a woman who is trying to have healthy recipes for her kids. I really want my kids to have the best food possible.  I never want my inability to cook to effect their health so I try to make wise decisions and it is a main reason I set myself up for this challenge of pinning for a year. I WANT to learn to cook.  I like helping my husband in the kitchen and my son and I have a good time when we are making the few things that I can already make (hot dogs, nachos, cereal).  LOL when It's written like that I seem unfortunate. Ok enough about me lets get on with the waffles of diversity!

Side Notes:
** for the milk you can use any milk product as the recipe states & they all taste good. So far I've made this recipe 5 ot 6 times & used 1percent, 2 percent, skim & evaporated milk.  It all works & doesn't effect the taste only the fat content.
**I used coconut oil like the original post I like it. It keeps the fat down some too. My only caution is that if that oil gets cold then its going to harden up & leave little balls in your batter.  You'll have to strain your batter before you can use it
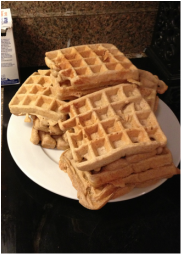
**This recipe also dosn't make a lot of waffles. In the above picture I had tripled the recipe because I knew that I like them. A trippled recipe made about 22 or so. I mention this because they FREEZE great! This is important for me because now I can make them ahead of time & bring them out of the freezer when I'm ready.
**Uses: I make breakfast & lunch sandwiches out of them for me and my son.  I have a few mixtures I've used so far. I mix cream cheese & a little bit of sugar & chocolate chips for a breakfast sandwich. For my son's lunches I sometimes send yogurt because he LOVES it regardless of the flavor or the time of day.  So now I put yogurt in the waffles and put the fruit in the waffles like I were making a deli sandwich.  He tells me it's Nummy Mommy so I'm taking his word for it.  I haven't tired it yet. I do use frozen fruit so that by the time his class goes to lunch the fruit is defrosted but still cold and some of the juices have leaked out into the yogurt.
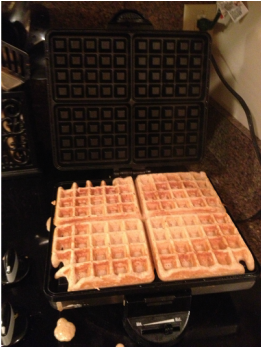
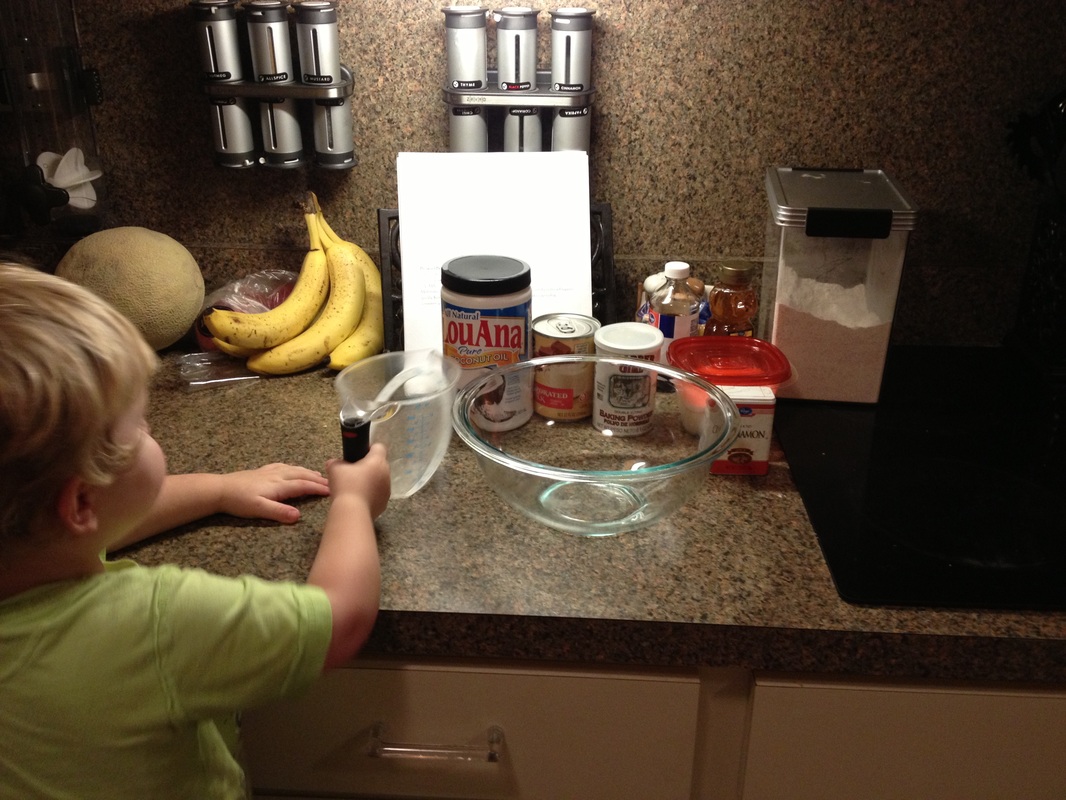
Begin by turning on the waffle maker. While it heats mix all the wet ingredients together as well as the baking SODA. (i wrote it big because it turns out there is a difference between soda & powder & my first set of waffles failed misserably). Once this is well combined add in the flour, baking POWDER, and salt & wisk it all together. 
    Since i had a helper I set up all my items premeasured and told him when to pour them in while I mixed.
The original recipe states to put a little dab of butter on the waffle maker on the maker but I used a little spray of canola oil to save on the calories and fat. Then spread out a little of the batter in the center of each waffle pattern. Make sure you don't put too much they expand when heated & it makes an amazing mess to clean up. You need not ask how I know this because it's obvious. 

Picture
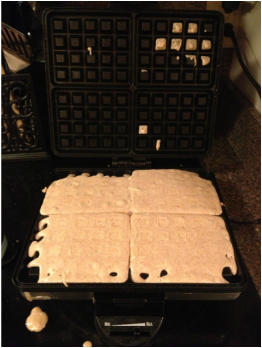
Please note the mess below the waffle maker. Yep this is how I am able to tell you what NOT to do. Because I did it. :)
Heres what you need:
2 large eggs
1 3/4 cups milk**
4 cup oil**
Tbs honey
1/2 tsp ground cinnamon
1/4 tsp baking soda
1 1/2 cup whole-wheat flour
2tsp baking powder
1/8 tsp salt
syrup & any other topping you'd like
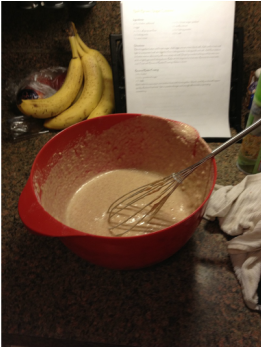
Tada! Waffles
Or in Gabe's words Tadammmm!

 
When we knew the boys were getting their own rooms I knew I wanted to make it something to suit each personality.  I also knew the move was going to be a difficult adjustment for my two year old who already had to adjust to having a baby brother enter the world and the loss of one of our dogs who had been there since his birth. So I knew it had to be something he could get excited about and I tried to let him help.  So of course Pinterest is an amazing venue for searching for ideas, which I searched tirelessly until I found something that I felt suited him and was easy enough to be completed by my limited artistic ability. 
My 2 year old LOVES airplanes so his room was so much fun to design.  I painted his room blue so that his walls could represent the sky.  I set out several different blue colors and let him choose.
  I was once told that children need to be allowed to make choices but that as the parent you need to be happy with the choices we give them. So I made sure that I loved every color I sat in front of him because I didn't want to send a message that his choices aren't good enough.  Too complex for a 2 year old? Probably but I wasn't taking the chance of hurting his feelings because it would be my luck he would remember the exact shade of blue he wanted.  But I'm off topic. (of course) 
Once I knew the walls would be air I knew I had to incorporate airplanes on the wall some way.  I saw several pins where people had painted airplanes on the walls. But guess who's not a professional painter/artist? This girl. :) BUT this pin was the answer to my prayers.
Here's how I did it.
You'll need a blank stencil (you can find this at Hobby Lobby or many other craft stores)
An exacto knife (craft store)
Paint--Since I'm painting it on the walls I wanted to use wall paint becuase I've watched acryllic paints crack with age and run when wet. I bought the new sample containers they have at home depot & lowes for about $2.

This project cost me about $25 or so.  That include the wall paint, the sample paint and the stencil sheets.


My son loves all transportation so I found this awsome rug at Ikea and the road leads to all kinds of cute pictures including volcanoes & icebergs.  He loves it & it help him actually learn :)

And of course we have his fish tank. We let him participate if feeding & taking care of them so I'm hoping we are starting an early lesson on responsibility. :)
I traced out a paper airplane template I found online from a google search onto the blank 8x10 stencil page. I created 2 different stencils for this room so that the airplanes would look like they were flying if differnt directions instead of repeating the same one over and over.  (I have issues with repetition)
Using your exacto knife cut out the pattern of the plane.
Once I was ready to paint the planes I secured the stencils on the wall with painters tape. I used one of those sponge paint brushes which was kind of messy I had to go back and touch up some of the lines.  So I would recommend using a small crafting paint brush. I will take you longer to paint it likely requiring a few coats but it will save you time because you won't have to touch up anything. After the airplanes themselves were complete I hand drew on the smoke marks onto the wall to show the airplane's path.  I tried to make the airplanes placement and smoke lines sugges that they came in his room through his windows. I also put one on the inside of his closet door. An idea I got from my neice Hannah. :)
My infant's room was easy to design because I already had his bedding and it was a jungle theme set that I found from the Gap.  I really wanted to make sure I didn't have 2 blue rooms, just because they are boys doesn't mean that they both have to have blue rooms.  So I picked the green from his bedding and make it a jungle themed room to match.  Here's the pin I used to inspire me.
For his room I had to enlist the help of my mom who is a GREAT artist.  We worked together on the tree for his room because there was no way to make a stencil of this magnitude.
So we drew the base of the tree with a pencil before we began painting.
I had to get a few different color sample paints for this project. Several for the leaves and the monkey. The other colors I created by mixing things together. 
Once we had the basic design of the tree limbs painted we began placing on the twigs that would connect to the leaves we haven't painted yet.  Then we each took a color and began painting leaves randomly.
We were very careful to make sure that left places for the animals to be placed.
To make the monkey and the owls I printed out a picture of each and cut it out.  I traced it into the place it belonged on the tree.  Once it was traced on I painted in the details with the proper colors.  There is also a blue bird in the very top of the tree but I hand drew that.
I also made his curtains from this really cute tan and cream colored patterned fabric I got from Joanns onsale. (They always have coupons and amazing sales.)
 
Picture
At the end of the year we moved into a new house and our boys no longer had to share a room. I was SO excited to be able to paint the walls any color I wanted and decorate each room with a theme.  I love to create things and I found this pin that showed you how to create your own canvas with any words you wanted. When I made these the link to the page worked but doesn't exhist while I'm writing this. So I'll try to explain how to do it.
The original link said to use a circuit machine, something I don't have so I'll tell you how I made it without one. 
I found my canvases on sale at Michaels Craft store for 50% off in packages of three so I was so excited.  I decided on a jungle theme and transportation theme for the boys room.  I wanted the canvas to follow the same theme. That's when I saw this pin and knew what I was going to do. 
Here's how you do it.......

Take the canvas and paint it the background color. In my case for the jungle room the background color is blue.  While the paint is drying find the silhouette on the internet or draw it out on paper.  Once you've gotten the drawing to the scale you like then trace it onto contact paper. I used words on mine as well so here I printed out the words I wanted in a word processing program and then traced that onto the contact paper.  Cut the pictures and words out of the contact paper and place them down on the dry canvas.  Make sure its nice and stuck on the canvas and then paint over & around the picture and words.  BE VERY GENTLE when painting over the words it could move your letters slightly making it impossible to read later and require major touchups or having to redo the project entirely.  Trust me I had to redo the completely word canvas a few times.  Let that dry and then peel off the contact paper. Viola you have your own designed canvas.

SIDE NOTE:
It doesn't matter what color your contact paper is though if your tracing out a ton of words I suggest clear if you can find it.

If your doing complete words I suggest using a small paint brush to simply paint around the words and save yourself some time in the long run. 

Also if your looking for a more colorful design you could swirl colors together for the background. Or you could paint on top of flea market finds like those canvases or pictures your find with hotel quality pictures behind it.
 
Picture
Today Gabe and I made air fresheners. You can find the original pin for it here.

As I've mentioned before I have 2 small boys who I love with all my heart.  Most of my pregnancy symptoms have gone away with the exception of the rediculous amount of pounds of course, and the pregnancy nose. I can smell when people in my office are eating lunch at their desk and I can, for the most part, tell what kind of food they are eating.  Why am I telling you this? Because it's why I decided to make these air fresheners.  I can't stand the smell of plug-in air fresheners or the spray kinds.  They make me sick to my stomach and give me a headache.  But I have a large breed dog and two messy kids a messy husband (sorry babe but its true). My house smells odd sometimes :)

I LOVE THESE THINGS! My house doesn't smell and the only time you smell the oils is if you close the room off you smell it for a few minutes then and then the smell dissipaits. I have one on a shelf near a window. This weekend we had amazing weather in the middle of winter, welcome to Georgia, so I smelled the cirtrus when the breeze was blowing in the window.

I reused several kinds of containers that were already in my house. The one in the picture above is a butter container form organic butter that I got at the farmers market. I cut holes in the lid and used it in the trashcan.  The whole point of the baking soda is to absorb smells, its why your supposed to keep a box of it in the fridge to keep the smells contained so they don't affect other foods in there.  I love the smell of citrus it make everything smell fresh and clean so the essential oil I chose was a citris blend. You place the baking soda in the container & then put several drops into the container. Replace lid & you have a homemade baking soda air freshener

I have some pictures below to help out if you need it. :)

Here's what you need:
Containers of your choosing
Essential oils of your choosing
Baking Soda
Place about a 1/2 cup of baking soda in the container.
Then use about 8 drops or so of the essential oils of your choosing.  I'd honestly say start small and go big if you need to because you don't want to have to start over.
Viola your done

Side note

I found several kinds of bottles in my house that worked. Anthing from mason jars to Gerber graduate food containters. I even used a honey container for one of my boys rooms.

I used citrus in the trashcan, bathroom and living room.
But all of my men have breathing/sinus problems so I used Eualyptus for the ones for the bedrooms. Because I read here that it was good for sinus
problems.

In the fridge though you'll need to make sure you don't use any essential oils it's only there to absorb smells.
Below are some photos of the ones I created and some of the steps.
Picture
This is the one for the trashcan. Its plastic so it doesn't get broken
Picture
Here's the one in the fridge. I did put more holes in this one to make sure to keep the fridge smelling fresh.
Picture
I used left over scrapbook paper and a scrapbook hole punch.
Picture
I used the pretty mason jars with the pretty paper to put in ones that are being seen.
 
Let me begin this by saying I used 2 different pins on this one. The first one I was disatisfied with the results and the second one i was too but it appeared better at first.  The second one does seem to work a little bit better once I adjusted some.  Theres a third one I just found that make the powdered not liquid detergent. I may try that next.
Below you will find the directions to the second pin. The one that I used and kept

Update! IT WORKS!!  Simply add a little bit more hot water & mix it up very good.  It will stay liquid to use it.

Alright Here's What You'll Need:
1 bar of soap (I used Fels Naptha)
1 cup of Borax
1 cup of washing soda
a large pot to hold 2 gallong
a grater
a funnel
and a container for the finished product


To begin grate the bar of soap and place it in a pot of a gallon water. Cook until it's desolved. Next add the Borax and washing soda & bring to a boil.  It should coagulate ( I didn't see that too much)
Turn off the heat & add one gallon cold water. Stir well. Pour detergent into container & your all done. I would suggest adding a little bit of hot water to this perhaps it will keep yours from going solid at all. Or you can add it later like I did.

The detergent works GREAT for my clothes. I have 2 small boys and I almost never have to use my stain spray these days.
Both recipies are very similar. They require a bar a soap to be melted in
water. Though each pins have different kinds of soap. One says any kind of soap
you want. Another says Fels Naptha bar soap. I couldn't imagine any kind of soap
working so I opted for the Fels Naptha because its designed for laundry.  Its
bright orange, which I wasn't expected but it smells GREAT.


Once you've melted the soap in water you'll mix in the designated amounts of
borax and washing soda. Both recipes then ask for more water.

Pin #1 tells you to let it
sit out overnight & it'll solidify into a watery gel mixture.  Unfortunately
my became a solid mass on the top & a watery mess on the bottom. I tried
mixing it back togehter with a hand mixer but it became very lumpy and quite
yucky.  So I poured it out & started over.
Pin #2 doesn't require
sitting out but once I put it in my jugs the results were the same a squishy
solid mass.
 
I'm excited to try this because
this would save my family hundreds of dollars a year.  Think about it. Laundry
detergent for a larger jug at BJs Warehouse will cost you upwards of $25 even
with coupons. And I do ATLEAST one load of laundry a day if not more.  Its a lot
of laundry detergent.  I probably paid a total of $20 for the three products
required to make the detergent.  I've made 2 large batches so far and I still
haven't put a dent in the Washing Soda and Borax boxes. 


I will say with the 2nd pin recipe I was able to add
a little bit of hot water to the jug and shake it a little and it mix togther
and was no longer a solid but was a consistency that was useable.  I washed my
first load of laundry with it today. No problems I can see. Now I only have to
figure out how to get water into the other larger jug and shake it up.
:)


  My husband figured out that a little hot water makes it liquid again to use. So if yours turns solid add a bit of hot, I mean SUPER HOT, water and mix it well.


Oh well........ See you guys tomorrow!


My son LOVES fruit snacks.  I mean like LOVES LOVES LOVES them. But they aren't the best snack food, convenient yes, good for you no. So i wanted to find a recipe to make our own in an attempt to save money.
I found 2 different pins. One pin takes boxes of jello to make fruit snacks, I'll likely try that one next.
This recipe uses all natural ingredients. I tried to stick as close the recipe as I could.
In the picture you will find my results :)
Let me begin this post by mentioning the number of times I have set a kitchen on fire & been subsequently banned from the kitchen for any reason.  Since the beginning of my marriage I have set it on fire 3 times.  I know where the fire extinguisher is & I'm not afraid to use it.  We even have a small kitchen specific spray can. And my mistakes are silly ones, which I believe are more scary. I turned the wrong eye on once and set the rag on fire that was sitting on it. I have also set the pot on fire because I forgot about my ramen noodles. :) See? scary. This is why I have spent the majority of my marriage asking my husband "What's for dinner?" or "What are you making tonight?" I mention this because part of this blog process is to grow as a person and with two small children need to eat more than nachos and hot dogs everyday. So I intentionally decided to do this pin instead of the other one to push myself.
Here's what you need:
Gelatin (found on the baking aisle with the sugar and pectin) The recipe calls for 5Tbs I disagree
Candy molds/ Ice tray/ or pan as the instructions suggest
2/3 cup Fresh or Frozen fruit
1 or 2 Tbs Honey
2/3 cup lemon or orange juice
Extra Step: I used blackberries for my fruit & they are FULL of seeds, that I hate. So once it was pureed I had to strain out the seeds.
Let the mixture sit for 5 or so minutes off the heat.
Begin stirring in gelatin 1 Tbs at a time. And then pour the mixture into a glass pan or into molds. I had these cute silicon ice tray molds we bought at Ikea earlier this year, so we use those.
Picture
Here's my lovely assistant showing you the trays :)
To begin combine the juice and the fruit together in a pot & cook on med heat stirring occasionally until fruit is tender. 
Once the fruit is ready incorporate honey
Once your done your ready to put the fruit in the blender. In my case the baby bullet (thanks again Hamma this thing is awesome!)

Attention Cautionary Tale

Picture
PLEASE secure the lid on your blender BEFORE you turn it on. Or you will end up like me covered in steaming hot fruit juice. It was also on 6 of the surrounding 7 walls, ALL the cabinets & cookbooks and a million other things.  So learn from me. Say it with me people.  Pour in liquids, SECURE LID, turn on blender. :)

Picture
Now these are ready for the fridge. Where they will sit for 30 mins to an hour.

The final product was not what I expected. They were so hard and rubbery that they bounced.  This is why I mentioned earlier that there may be too much gelatin in the recipe.  So my husband, the chef (literally), is going to make them with me again another day so that we can figure out what went wrong. Because I assure you I likely did something wrong between the explosion and cleanup and everything else.  I highly doubt the recipe is completely flawed and that isn't the purpose of the blog any ways. 

Sooooo stay tuned for an update.

Do you know what I did wrong? Comment or contact me
 
Picture
Today I decided I needed more storage for all the boys toys and things they got from Christmas.  So I had to find a place that would be out of the way and not clutter up my house.
Normally I'd just buy a rubbermaid tub to go under the couch but our couch only has a small clearing to the floor. I believe 4 inches or something like that.  Which if that size exhists I've never found it in Walmart.
So I found this pin and it inspired a thought of making my own box with leftovers of Christmas.
When I saw the box for the play kitchen my son got from his Hamma (thanks Mom) I decided I could make it happen. So.....

I began with the kitchen box & broke it down to make cutting a little easier. Next i measured out 4 inches from edges.  That way once i taped the "boxes" back together they would be 4" tall boxes ready for use.
My mom is actually the one that suggested fabric, also left over from making
various things through the years. I had to large scraps left over from curtains
I'd had in our old house and had to be shortened when we moved into our new
house. I layed that fabric down & cut it to size for each side of the box. I
used my handy hot glue gun to glue down the fabric.  I also needed a way to get
it out from under the couch so I puched holes with scissors in the front and tied left over ribbon in
it. To secure it I poured hot glue all over it too.
Side note: please put your hot glue gun back in the same place and don't touch the molten hot glue :)
I'd say this note isn't needed but I left out the ample burns and inappropriate words that came out of my mouth during this project. Ouch also happened a few dozen times too. Sooo Good Luck!
The boxes aren't perfect they bend a little when I pull to get stuff out but they organize my home so they  make me happy :)
So that's it! Hope you enjoyed it. Hope to see you tomorrow!
Next I taped the boxes back up. I pondered for awhile on how to make them pretty because while they are underneath my couch the fact that they have to come out from under there to get stuff meant they would be seen on occasion. Besides I can't show off my craftyness with ugly torn up kitchen play boxes. I was thinking I'd use wallpaper or paint both of which i have left over at the house.
Here's the finished box pushed slightly under my couch. I had enough box for 2 complete "couch drawers"
 
Part of my quest include trying to organize my life and our house. I have the physical need for organization I'm sure my husband will never understand. And with two small boys I'm certain they wont get it later.  So in an attempt to stop the arguments and feeling like nothing ever got cleaned or done in a timely manner I created a family planning book. This is based on an idea I got of Pinterest of course. You can find the link to the original pin here.
I took the idea from the pin but I had to change it to suit my family.
Picture
Originaly I had the various printables the I found either through this pin or through verious emails that I've gotten.  But they were all different style and colors and I just couldn't handle that. I've had a love of polka dots for a few years now so I decided to create our family planner with bright primary color dots. Mostly because I thought the bright colors would make it more appealing to the men in my life. :)
Also I have decided to print them & put them in the plastic sleeves so that I can write on the plastic with dry erase markers and save myself some money for the ink and paper for the printing. Plus I love the idea of not wasting trees to print tons of things out.

The planner has 5 basic sections.
Cleaning Lists
Goals
Event
Planning
Calendar
Emergency Plan
The cleaning tab has multiple pages including a weekly, monthly and yearly cleaning list.  I also included in this section a House maintenance list to write down all the things around the house that still need to be fixed or have recently broke. For example since we've moved in we still haven't finished patching a hole in the ceiling in the bathroom. Shame on us I know but it just needs some sanding and painting. (That's me trying to make myself feel better about it ) This is an important list because my husband has his own box on the cleaning list. Since he has alternating days off I couldn't put down things on a specific day and hope he sees them. He gets his own list and that way I'm not bombarding him with multiple ever-changing honey do lists. 
In the Goals list I have the most pages. I LOVE todo lists, they make me feel accomplished. And if I do anything not on my list? You got that right I write it on my list so I can mark it off. :) I'm an odd bird about todo lists, well about a lot of things actually. In my goal list I have the following:
Weekly & Monthly & Yearly Goals - Where we write down things we want to accomplish for that time period this is simple household todo list stuff
Next is a Weekly Goal sheet that is detailed and person oriented. On here I have it broken down for personal, family, business, marriage, faith and homemaking goals. I have a list & my husband has a list. This is anything but todo list stuff. They are personal and deep goals to in my mind help improve us as people, parents, and spouses.              
        After that we have Goals for each family memeber for 2013. For me and my husband theres a place to write goals for ourselves and places for us to write on each others list to say what we'd like the other person to work on. I believe an open line of communication can help us make fights and misunderstandments to a minimum and writing them down keeps the other person from forgetting or getting their feelings hurt. For the kids I write down things we want to teach them or make sure they see. For example on my 2 year olds I want him to start recognizing words like he does with his letters and numbers  and we need to work on potty training.            
        In this section I also have financial goals for the family and a hope list. The hope list is closely tied to our financial goals because the hope list is basically for us to write things we want to be able to afford this year. Things like a new tv or a new tattoo.  Things that aren't a necessity but that if we stick to our budget and save towards it then it would be a nice reward. Theres also a place to write household needs for things like items needing replacing like a bathmat or new coffee table, ect.
In the Event Planning section I have a page to plan out the detail of each boys birthday party including theme, location, date and cake and decoration ideas. I left places to paste pictures if I want to. I also have this section to write out other party plans if I'm in charge of any other get togethers through the year. My sister in law is big on family dinner night so if we are hosting family night then I'd write my plans in this section.
Immediately following that I have the calendar including a page with a year at a glance to write out important dates so I don't have to flip to each page to find Casey's birthday or whatever I'm looking for. 
And then end I have the emergency plan that I printed from here. I have it in the back because I won't need it each and every day but if its an emergency its easy to open the notebook backwards and its right there.
In the front pocket I have my weekly plan of attack which is a just AMAZING download that I got in an email. It allows me to plan out my todo list in an orderly fashion without overwhelming myself. It helps me keep the list small and manageable. If I can find the old email I'll attach the information because this should really be shared. Yes it's THAT good.

Now that I've wrote all this down it looks a smidge intimidating and makes me look fairly crazy for needing this much organization.
See you guys tomorrow!